Dental Blocks: Are They Right for Your Patient? (The answer is “yes”)

It is the morning of my dental appointment. I wake up, I meticulously brush and floss my teeth because I need to have my teeth looking their very best before I go have them checked!
I am lucky to have good teeth, no, not good teeth, great teeth. The work I need is typically minimal. I go in pain free, but do I leave pain free? No. The picking between my teeth with a scaler or curette causes pain. My gums hurt for quite a few hours after. I usually end up taking an NSAID and that is for a ‘minor’ cleaning.
Now consider a dog or cat with dental disease. They often require extensive periodontal treatment, including subgingival curettage or extractions. If my minor dental causes pain, their dental causes significant pain and I think most of us acknowledge that.
To properly manage our patient’s pain, we must be including regional analgesia in our dental procedure protocols. Let’s discuss why and how to perform four of the common blocks.
Why Regional Analgesia
Any complete anesthetic and pain management plan should include regional analgesia or freezing. With proper training, regional analgesia is a powerful tool and well within a technician’s a scope of practice to perform.
It can make a significant difference for our patients as they wake up from a dentistry!
There are four pathways through which a body recognizes pain. They are:
1. Transduction
2. Transmission
3. Modulation
4. Perception
These pathways are complex. We do not have time in this article to cover all the details, but we do have to talk about the first part of this process which is transduction.
Transduction is essentially the transmission of a noxious (painful) stimulus into an action potential on a sensory nerve. Think of it like that initial cut of the scalpel blade. That moment starts the surgery, but it also starts the pain process.
If we deal with that initial painful stimulus through regional analgesia and then manage the rest of the process with systemic pain management, we have a patient with a proper and well-done pain protocol!
We can use dental blocks to have our patients waking up in a whole new world of comfort.
The Agents Used for Regional Analgesia
There are two commonly used agents in the veterinary industry; they are Lidocaine Neat and Bupivicaine. Both are local anesthetics and they both have advantages and disadvantages.
Let me start by discussing how I have used them in the past and what I have changed in recent years.
I always used to do appropriate calculations and then mix Lidocaine and Bupivicaine in the same syringe prior to administration thinking that I was getting the rapid onset of Lidocaine with the duration of Bupviciaine. This was, and still is in many cases, common practice.
After reading and discussions with colleagues, I have come to find out that I was not getting what I thought I was. It turns out that what you are getting is a dilution of the two agents within each other.
What we end up with is a slightly delayed onset, a decent duration (but not to the same extent as Bupivicaine alone), an adequate analgesic
effect.
I have since started using Bupivicaine only and have just as much pain control with a bit more predictability than when mixing the two agents.
Do remember when using Bupivicaine, it is cardiotoxic and absolutely must not be given intravenously. Aspiration to check for blood
prior to injection is required.
The Nerves
The four blocks we are discussing today are:
1. Mental Nerve Block
2. Infraorbital Nerve Block
3. Greater Palatine Nerve Block
4. Mandibular Nerve Block
For all of these blocks I would be using a 25-gauge x ¾ inch needle and a 1 ml syringe.
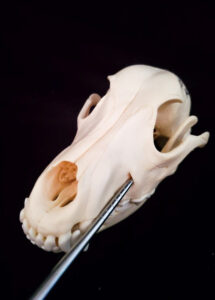
This picture shows the placement for the mental foramen block. I find this one tricky to do!
In theory, performing this block is straightforward. You simply pull the lip just behind the canine tooth (skin frenulum) slightly ventrally and then guide the needle (with your dominant hand) in a caudal and
ventral direction passing into that middle mental foramen.
Once you feel positioned you aspirate back slightly and then inject your calculated volume.
This will block the buccal mucosa and lip rostral from the foramen to the midline. If the needle is placed quite far into the foramen the block becomes a bit more effective resulting in freezing of the mandibular canine and incisors.
You do have to remember that placement too far into a foramen can cause damage, so it is preferred to only put the tip of the needle in.
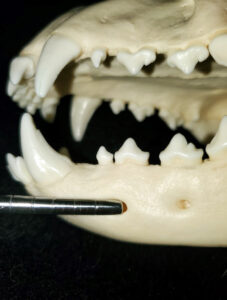
This image shows placement for the infraorbital nerve block in the dog.
The foramen where the needle is placed contains the infraorbital nerve as well as the infraorbital artery and vein.
Placement of the needle is typically done with the lip lifted and gingiva exposed. It is very easy to palpate the foramen in most animals. The needle tip should only be put in the foramen.
Caution must be used here especially in cats as the globe of the eye is very close to this foramen.
You should gently aspirate back and inject the calculated amount of agent.
This will block the ipsilateral premolar, canine, and incisor teeth. The bone and soft tissue around the teeth will also be frozen.
After the injection is done, you can place pressure over the injection site. I feel this helps the agent move caudally to some extent. I do
not know if there is truth to that, but I feel it helps!
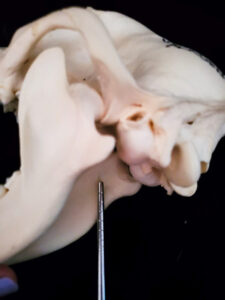
This image shows the inferior alveolar nerve block.
This is a tricky foramen to locate. It is on the medial aspect of the mandible beside the mandibular tooth roots.
Because of its location, you cannot access the foramen with the needle, therefore, the analgesic agent must be administered immediately next to it.This block can be done from either inside the mouth or outside the mouth as shown by the pictures.
The landmark is much more obvious in dogs than in cats. You locate the mandibular notch; the foramen is dorsal (on the medial aspect) to this notch palpated on the mandible.
To do this block from outside the mouth you will need to be cautious with asepsis. I do not shave the site, but I do make sure that there no obvious skin infection and use alcohol before injection. You will need a longer needle with this block. I use a 22 gauge by 1 inch most frequently. I push the needle through the skin and may hit the mandible. If I hit the mandible, I walk off the medial aspect of the mandible and place the needle about halfway in. At that point, the needle should be adjacent to the foramen. I then aspirate back slightly and inject the volume.
For cats, the mandibular notch is hard to palpate. For them I use the middle of the zygomatic arch. The foramen will be directly ventral of that landmark.
A lot of people, myself included, prefer doing this block from inside the mouth. For this technique, I go back to using a 25-gauge x ¾
inch needle. The needle is gently inserted in the oral mucosa just caudal to the last molar. When you feel the mandible, you walk the needle off the medial aspect of the mandible about halfway down. You should be adjacent to the foramen from this angle.
If this block is effective, you will block all ipsilateral mandibular teeth and bone as well as all the soft tissue lingual to the mandible which is awesome! It is a tricky one, but highly effective when done properly.
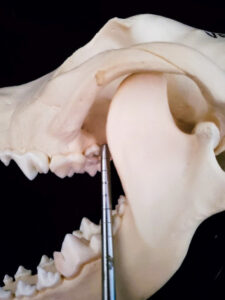
This image shows the caudal maxillary block. This is a wonderful block for the maxillary arcade.
It blocks most major nerves in that area. If the block is effective, it will freeze the teeth, soft tissues, and bones of the side it has been used on!
This block must be performed from inside the mouth. You must open the patient’s mouth wide and pull back the lips sufficient for you to see.
The needle is placed in a dorsal direction (toward the palate) directly behind the maxillary second molar.
You do not want to advance the needle too deep into this area, as caution must be taken given the location of the eyeball, especially in our brachycephalic breeds.Typically 3mm is all that is required.
Once your needle is placed you gently aspirate back and inject the volume. It is well within the scope of a veterinary technician to perform dental blocks! We should be advocating for them in most dental patients.
The local agents are inexpensive and when a technician is skilled, they really do not take much time at all.
You do have to be mindful of the timing of the blocks. I try to get full mouth radiographs to my attending veterinarian as soon as possible so that once we have a treatment plan in place, I can provide the local anesthesia to the regions of interest and then continue with my dental
charting and cleaning. Once the veterinarian is ready to perform the extractions, the blocks are typically effective.
It is not only patients with extractions that can benefit from dental blocks. I know when I have a dental cleaning, my mouth is painful after and I have less work done than what they would.
Sub-gingival curettage hurts! Consider placing dental nerve blocks for your patient’s basic dental cleanings.
Your patients will thank you when they are waking up.
References:
Cital, S. (2020, July). I Like Bog Blocks and I Cannot Lie. Dvm360. https://www.dvm360.com/view/i-like-big-blocks-and-i-cannot-lie
Cripwell, D. (2018, June 29). Pain, what a Pain! (Part 2). AlfaxanMultidose. https://www.alfaxan.co.uk/news/pain-what-a-pain-part-2
Beckman, D. B. (2016, September 9). Dental Nerve Blocks in Dogs and Cats Enhance Anesthesia Safety. Dental Nerve Blocks in Dogs and Cats Enhance Anesthesia Safety. https://veterinarydentistry.net/dental-nerve-blocks-dogs-cats/
Interested in learning more? Check out our Online Dental Education Courses and our Bisecting Angle Guides that will help you rule the angles.