Anything But Straight Forward: A Journey with Bisecting Angle Technique

Veterinary technology school goes by in the blink of an eye. My time as a student flew by, and now I find each year passes by faster as a faculty member. Now, I tell students that learning often really begins once you graduate and start your first clinical job. In school, you are expected to learn so much in 2 short years that is hard to have it all entirely understood, let alone completely committed to memory.
I remember learning a lot of things and then I remember forgetting a lot of things. One of the things I completely forgot was how to do bisecting angle technique dental radiographs.
Dental radiography is a skill that takes time to develop. You must start with understanding the theory, and then you need to practice. You need to practice more than once, more than twice. You must practice many, many times on many, many animals before you feel confident.
When I graduated, I got an awesome first job where I learned plenty, but I did not do a lot of small animal dentistry and I certainly did not do small animal dental radiography. I graduated in 2003, the landscape of small animal dentistry has changed dramatically since then.
When I finally started taking dental images, I found myself at a significant disadvantage. I had forgotten the theory and had not practiced taking any dental images, so my skills were in a more dire state than when I had first graduated! I had essentially gone back to being a second-year student sitting in a lecture entitled ‘Introduction to Small Animal Dental Radiology.’ Oh gosh.
So, what does a person who finds themselves in this exact position need? Let’s explore exactly that, so hopefully your journey is easier than mine!
Understanding the Theory
First things first, time to go back to class. Theory is key. Without understanding why we need bisecting angle, and what variables contribute to a successful image, you are driving blind.
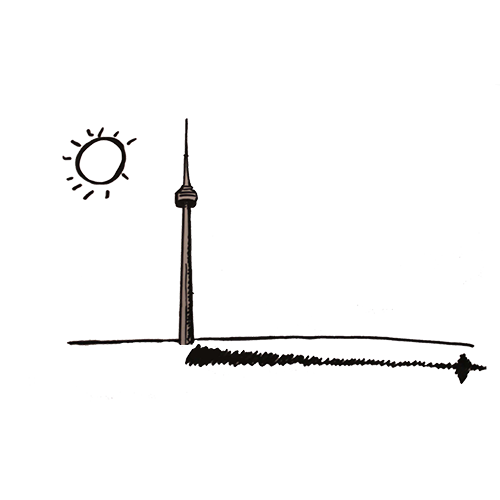
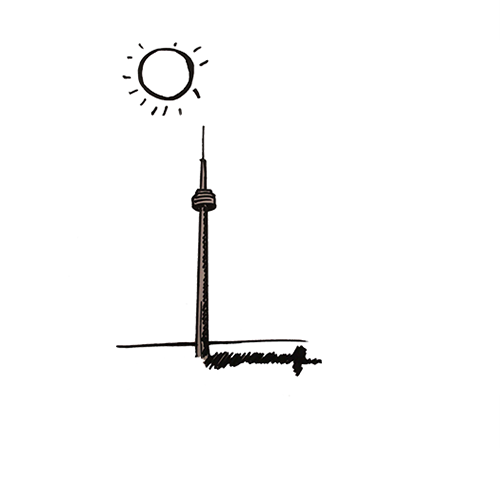
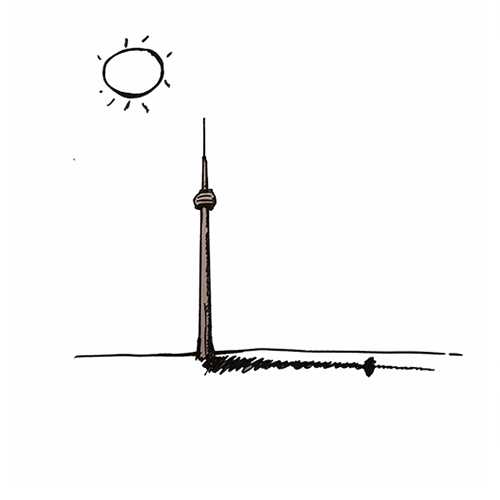
We need bisecting angle technique in a space that is too small to achieve lining up the x-ray generator, an image to be radiographed, and the sensor (like conventional radiography). We need to use our equipment to essentially cast a shadow of the tooth root on to the sensor.
I want you to consider how a pole standing in an empty, flat field would cast a shadow. At high noon (with the sun directly overhead) this pole will cast no shadow. As the sun drops lower and lower in the sky, the shadow gets longer and longer. This is a common analogy to explain bisecting angle and it is essentially what we are doing, only, the tooth root is the pole, the x-ray generator is the sun, and the sensor is the ground. Some people (in my opinion the lucky ones and certainly not me) intuitively understand this concept and start taking beautiful radiographs.
 |  |  |
I reviewed this concept when I first started back with dental radiography, but I was left with image after image of elongated roots, foreshortened roots, only the crown and not the root apex, and sometimes I got nothing at all!
Was I ever frustrated.
I learned that I needed to control the variables I knew I could: patient positioning and the sensor. I figured out that I could visualize the angle far easier if I did the maxillary images with the patient in sternal recumbency with the jaw as parallel to the table as possible, and the mandibular images with the patient in dorsal recumbency with the mandibular jaw again as parallel to the table as possible.
Sensor placement also made a difference to me. The shadow analogy was most easy for me to understand. Keeping in mind that the ground is flat, I try to place the sensor as flat as possible in the mouth (parallel to the table) with the teeth to be radiographed on the most buccal or rostral edge of the sensor.
With those variables controlled, all I had to worry about was the angle of the beam! Then I learned some techniques that told me what angles to expect to see on the x-ray generator when the bisecting angle is correct. If you look at the rotator arm of the generator, you will see numbers and lines. Use those numbers to help you! Depending on the tooth, you can expect to see numbers ranging from 40 degrees to about 70 degrees (with the most common angles being 45 – 55 degrees).
All of these things started to help me, but then I learned new things…..
Where is Bisecting Angle Needed
In school, I remember (vaguely) learning that bisecting angle was used for the entire maxillary series of images and the mandibular incisors and canines in both dogs and cats. The mandibular series caudal to the canines was where I could breathe a sigh of relief! I can use parallel technique across all of it, wrong!
In cats, bisecting angle should be used for their entire mouth and in dogs, parallel technique should only be used for the caudal mandibular premolars and molars. I learned this many years after school. I had to use that dreaded bisecting angle technique in more areas than I thought. Everything I described above helped me a fair amount, but I am a very visual person. I needed more so I started working with
positioning devices to help me see the angles.
Tools to Help you See (and I don’t mean glasses)
Every time I go to my dentist, I envy them. They have a device used when taking dental images that seems very helpful. It holds the sensor, has a bite plate, and has a circle outside of the mouth that appears to indicate or guide x-ray generator placement in some way. Now, I will be the first to admit that I do not have knowledge or skills in the world of human dentistry, but that device looks useful to me and I always reflect on how we could adapt some sort of positioning assistance device to veterinary medicine.
In school I learned to use either 3 tongue depressors or 3 cotton-tipped applicators to help indicate the 3 different angles you need to assess. You put one at the angle of the sensor, one at the angle of tooth root, and use one to visually assess in between those two for bisecting angle placement. It is a nice visual for me and it does help along with using the other techniques noted above.
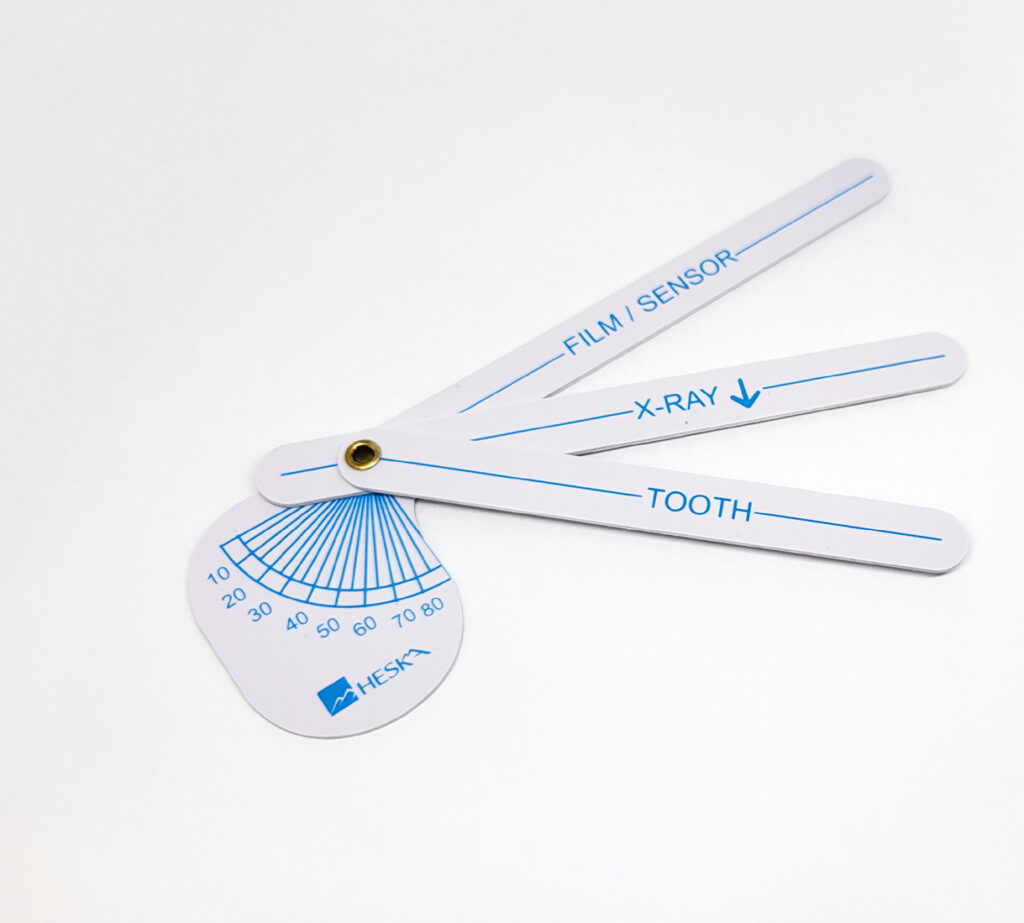
Very recently, Heska Canada has released a Bisecting Angle Guide that brings cotton tipped applicators or tongue depressors into one handy tool. It has moveable arms to help you see the angles noted above. The film/sensor arm is lined up with the sensor, tooth arm with the tooth root, and then your x-ray arm in between those two. It will also indicate to you exactly what angle you are radiographing, which is a wonderful confirmation that you are on the right track.
As someone who has made every mistake with dental imaging, I am keen to integrate this not only into my dental radiographs but also into my teaching to help people who are very visual and need a guide.
Maybe the Bisecting Angle Guide is our first step toward a device like the one used in human dentistry, adapted to veterinary dentistry!
Education & Practice Makes Perfect!
Remember, dental radiography is not going to get easier with one or two full mouth series a year. You need to be doing these regularly.
Practice truly does make perfect. If you are not doing them regularly on anesthetized patients, make sure to order skulls or radiopaque
models to practice on. If you are acquiring beautifully diagnostic images on your models, it will make it that much easier on a live patient.
Education is also very important. If you are feeling like you may have forgotten since school (like I did) or need a refresher, Heska
Canada offers plenty of additional support for dental imaging. Make sure to check it out.
Conclusions
Dental radiography is hard, and it is completely necessary. We need to be doing full mouth radiographs in every patient undergoing a COHAT. It is simply good medicine.
I sympathize with anyone struggling. I have certainly been there (and will be again). Taking the time to understand the theory and practice will make things easier. Using positioning assistance devices like the Bisecting Angle Guide will also help dramatically.
With time, you will find that full mouth diagnostic images will come easier, faster, and will become fun!
Twenty years ago, if you would have asked me if I thought I would I have fun with dental radiography my answer would have been,
‘could you talk to me about those again, I don’t remember much,’ now I am excited about every patient (or even model) I get to radiograph!
Interested in learning more? Check out our Online Dental Education Courses and our Bisecting Angle Guides that will help you rule the angles.